
Happy Father's Day! My sincere wish to all the father's out there for a day spent doing what you like to do best with those that you love being with! Even a simple thing like going out for breakfast - even though that may not be as simple in our new normal - seems like a big event on this Father's day! My dad and my father-in-law look down from Heaven on my husband on this day to see what a great Dad he has become.
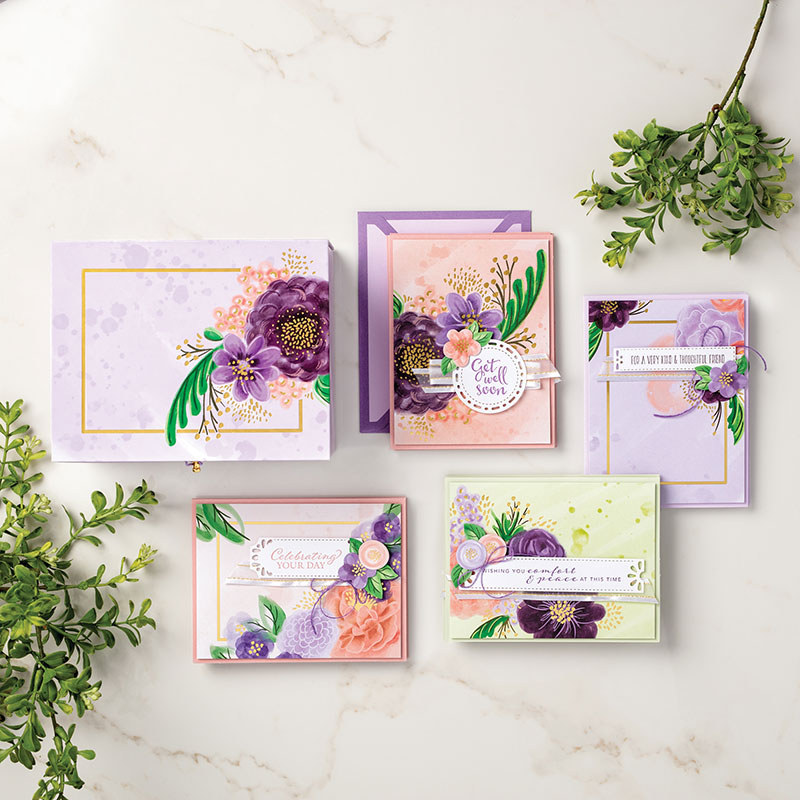
Over the last week, I've been having so much fun admiring all my new products from the new Stampin' Up 2020 - 2021 Annual Catalog. I was having a really hard time in making a choice on which product to select for this week's project. The beautiful pinks, purples, gold foil and the special coordinating box containing the Gorgeous Posies Project Kit screamed my name the loudest. And it is gorgeous!
My finished cards from the kit. To complete the cards sentiments, I used the coordinating Gorgeous Posies Cling Stamp set along with Gorgeous Grape, Blushing Bride, and Blackberry Bliss stamp pads. The purple and pink flower die cuts included in the kit are so sweet. There are more than enough to finish the 16 cards with leftovers for another project. As I placed them on my card fronts, I just had to embellish them with a little extra bling using my favorite - Champagne Rhinestone Basic Jewels. Just the perfect touch for this girl!
The kit contains supplies to make 16 Gorgeous Posies cards: 4 each of 4 beautiful gold foiled floral card fronts; 8 Blushing Bride, 4 Soft Seafoam Green, 4 Purple Posy pre-folded card bases; 16 coordinated purple envelopes; white laser cut labels; printed flowers and leaves die cut pieces; 3 yards for the prettiest white gold trimmed ribbon; 4 yards of the purple linen thread; and lastly, the special designed box to hold your finished cards. The kit doesn't contain stamp set or ink, however, there is a solution for that!
I had so much fun watching these cards come together, I was sad when my 16 beautiful cards were completed so quickly. So of course, I needed to make some more from my own supplies by using the coordinating stamp set. I made pink ones, purple ones, burgundy ones - I loved each beautiful creation as it took shape!

Instructions to make this card are as follows:
- Cut Blushing Bride cardstock 4 1/4" x 11". Score at 5 1/2". Fold on the 5 1/2" score line.
- Cut Gold Foil sheet 5 1/4" x 4".
- Cut Very Vanilla cardstock 5" x 3 3/4" for card front and 5 1/4" x 4" for inside card sentiment.
- Die cut Very Vanilla cardstock scrap (3 1/4" x 3 1/4") using the circle with circles from the Painted Labels Die set.
- Stamp as follows on the card front using stamps from the Gorgeous Posies Cling Stamp set:
- Using Blushing Bride stamp pad and the large flower from the stamp set, stamp a flower in the upper left and lower right corners of the card.
- In the lower right corner above the flower just stamped, using Blushing Bride stamp pad, stamp off once and then stamp two more flowers. This gives a fainter flower adding dimension to the card front.
- Using Soft Seafoam Green and the leaf stamp from the stamp set, stamp a leaf on either side of the flower in the upper left corner and then stamp 3 leaves around the two lighter flowers in the lower right hand corner.
- Using an embossing buddy, pounce the entire card front to prep the card front for embossing powder.
- Using Versamark stamp pad and the grouping of dots stamp from the stamp set, stamp in the middle of each flower and a couple of places around the flowers to fill space. Leave a few open spaces for the branches. Sprinkle generously with Gold Stampin' Emboss Powder. Carefully, stamp the branches to fill in the extra space and sprinkle with Gold Stampin' Emboss Powder. I like to use a coffee filter to capture the excess powder. When putting the powder back into the jar, I carefully fold the filter in half and "funnel" the excess powder back into the jar. I use a small tip paint brush to remove any annoying embossing powder from the card front that I don't want to set permanently when I heat the powder. Using the Heat Tool, heat the embossing powder until it melts. Don't heat too long as it can burn the embossing.
- Using Blushing Bride stamp pad and a Sponge Dauber, gently apply ink around the circles around the circle die cut.
- Using Blushing Bride stamp pad and stamp your favorite sentiment onto the center of the circle. I used a sentiment from the Inspiring Iris stamp set.
- Attach the circle to the card front using Stampin' Dimensionals to "pop" up.
- Attach two left over die cut leaves to the back of a left over die cut flower from the Gorgeous Posies project kit with Stampin' Seal. Attach to the card front using Stampin' Dimensionals up against the circle.
- Attach the finished card front to the Gold Foil Cardstock with Stampin' Seal.
- Attach the finished Gold Foil Cardstock to the card base with Stampin' Seal.
- Stamp another sentiment on the 5 1/4" x 4" Very Vanilla cardstock. Attach with Stampin' Seal to the inside of the card.
- The final touch - embellish the card front by placing a small Champagne Rhinestone Basic Jewel inside the small flower die cut and inside the sentiment circle.
The Gold Embossing powder really made this card shine. I used Highland Heather for a soft purple card, then stepped it up using Gorgeous Grape. My last couple cards I made with Blackberry Bliss for the flower and Pretty Peacock for the leaves - a little exotic. Which one do you like the best?

If you haven't yet taken a closer look at the Gorgeous Posies Project Kit and the coordinating stamp set, you may want to take another look. It's a very simple project to put together. The gold foiled floral prints are stunning! And the box - well - it's a beautiful display item to hold all 16 cards and more. I was able to put all 26 cards I made and still have some room. This would be a fabulous gift for a special someone that is in need of cards to send.
All the supplies are available in my online shop - except the coffee filters and the small paint brush used in the embossing steps.
Have a fantastic week! I'm already thinking about next week's project!
Supplies used for today's card:


Add your comment